Ableton Live Mastering Chain
In our increasingly fast-paced world, we often need to submit a track on very short notice — without the time to bring in a mastering engineer for the final sound. However, our music always has to be up to the standards of our modern world, no matter what. This is a situation when having an easy-to-access, quick DIY mastering chain can make all the difference. In this post, I’m going to cover how to build a simple yet effective mastering chain in Ableton Live — using only built-in devices. You can get surprisingly good results this way. However, if you feel you’ve reached the limit of your tools, you can always look at some manufacturers that offer specifically mastering grade devices such as Brainworx, UAD, Fabfilter, and iZotope Ozone.
I encourage you to follow along but in case you don’t have time for that, that’s cool: you can download the device here.
First Things First

Healthy peak levels on the master channel
First of all, let’s make sure that our stereo master output level meter is between -3 and -6 dB. This is good general practice anyway, a habit worth getting into. There are several ways to to that, here’s one:
Make sure you have Live’s Session View in front of you.
Play the track and keep an eye on the master channel level meter.
If it’s between -3 and -6 dB, you can skip this whole part and jump to the next section.
If it goes above -3 dB, you’ll have to pull back the individual tracks; if it dips under -6 dB, you’ll have to bring them up. Here’s how:
Select any one of your tracks — just click the title at the top.
Now hit CMD + A to highlight all of them.
Move the volume fader of any track in the desired direction — and the rest of them will follow.
Go to 2.
The Shell
Let’s add an Audio Effect Rack to our master channel. It’s in the browser under Audio Effects. This is the container in which we’re going to put all our devices, so we can control their most relevant parameters using the rack’s macro feature, and so that we can save the entire chain as one unit.
Input Gain Control
Let’s create the first device: Utility. It’s in your Audio Effects in the browser. Drag it _inside_ the rack. This is gonna be useful for a number of reasons:
We can control the gain that goes into all the devices in our rack.
We can control the stereo width of our mix.
Check it in mono.
Make the bass frequencies mono.

Macro assignment
Speaking of, it’s generally good practice to mono the bass frequencies below 120 Hz, so click the ‘Bass Mono’ button.
Now ctrl + click the Gain parameter and select ‘Map to Macro 1’. That allows us to control the Utility’s gain by adjusting the first macro knob. Let’s limit the range however: click the ‘Map’ to bring up the mapping specifications. Set -5 dB for the minimum and +5 for the maximum values. To quit mapping mode, hit the ‘Map’ button again. Let’s rename this parameter to ‘Input Gain’. Select the macro and hit CMD + R to rename it.
Now ctrl + click the ‘Width’ knob and select ‘Map to Macro 5’. This will enable you to control our audio’s stereo width. Engage mapping mode again and change the maximum value to 150 %. When done, double click the Stereo Width macro control to bring it back to unity, that is, 100 %.
Filters

Switch on Oversampling.
Adding an EQ allows for applying adjustments when necessary and also good for a low and high cut — to remove unwanted frequencies.
Add an 'EQ Eight from the Audio Effects folder. Set up a high-pass filter at 20 Hz (use the steeper 4x curve), and a low-pass filter at 19 kHz (4x). Now ctrl + click the title bar and select Oversampling. This makes for better quality, especially in the high frequency range.
Multiband Dynamics
Drag in a Multiband Dynamics module next. This allows us to add moderate compression to 3 different bands across the spectrum.
Hit the ‘A’ button at the bottom to bring up threshold and ratio values for each band.
For the high band, set the threshold to -26 dB; for the mid, to -20 dB; and for the low, to -12 dB.
Now assign the ratio of the high band to macro 8, the mid to macro 7, and the low to macro 6.
Now enable mapping mode again. Set all of the ratio minimum values to 1 : 1.00, the maximum to 1 : 2.00. Quit mapping mode.
Rename macro 6 to ‘Low Comp’, macro 7 to ‘Mid Comp’, and macro 8 to ‘High Comp’.

Glue

Glue Compressor
Next, let’s add a Glue Compressor. Set the attack to the maximum value, the release to the minimum, and change the ratio to 4.
Now ctrl + click the threshold and select ‘Map the Macro 2’.
Then ctrl + click the makeup and select ‘Map the Threshold’. Now we have one macro knob controlling both threshold and makeup. But the more we pull back the threshold, the more gain we want to add, so let’s set that up in the mapping. Hit the ‘Map’ again to enter mapping mode.
First, ctrl + click the Macro 2 Threshold lane and select ‘Invert Range’. Then adjust the maximum value to -20.0 dB.
Now change the maximum of the Macro 2 Makeup lane to 2 dB. Quit mapping mode.
Rename this macro to Glue. When you bring it up, it will lower the threshold of the glue compressor and in the meantime, raise the gain.
Saturation

Now let’s add a Saturator to our rack. Again, it’s in the Audio Effects folder. Change the ‘Drive’ to 5.00 dB and the ‘Output’ to -3.00 dB. Ctrl + click the dry/wet parameter and map it to Macro 3. Rename Macro 3, which now changed to ‘Dry/Wet’, to Drive.
Limiter
Let’s drag in a limiter. Assign the ‘Gain’ parameter to Macro 4. Enable mapping mode and set the minimum value to 0, the maximum to +6.00 dB.
Customization Tips
Add colors to the macros by ctrl + clicking them and assigning a color.
Ctrl + click the rack’s title bar to add your chain a unique name.
Click the show/hide devices button to have only the macro controls visible.
Click the floppy disc icon on the rack to save your chain.
And finally: adjust anything and everything to better suit your type of music.

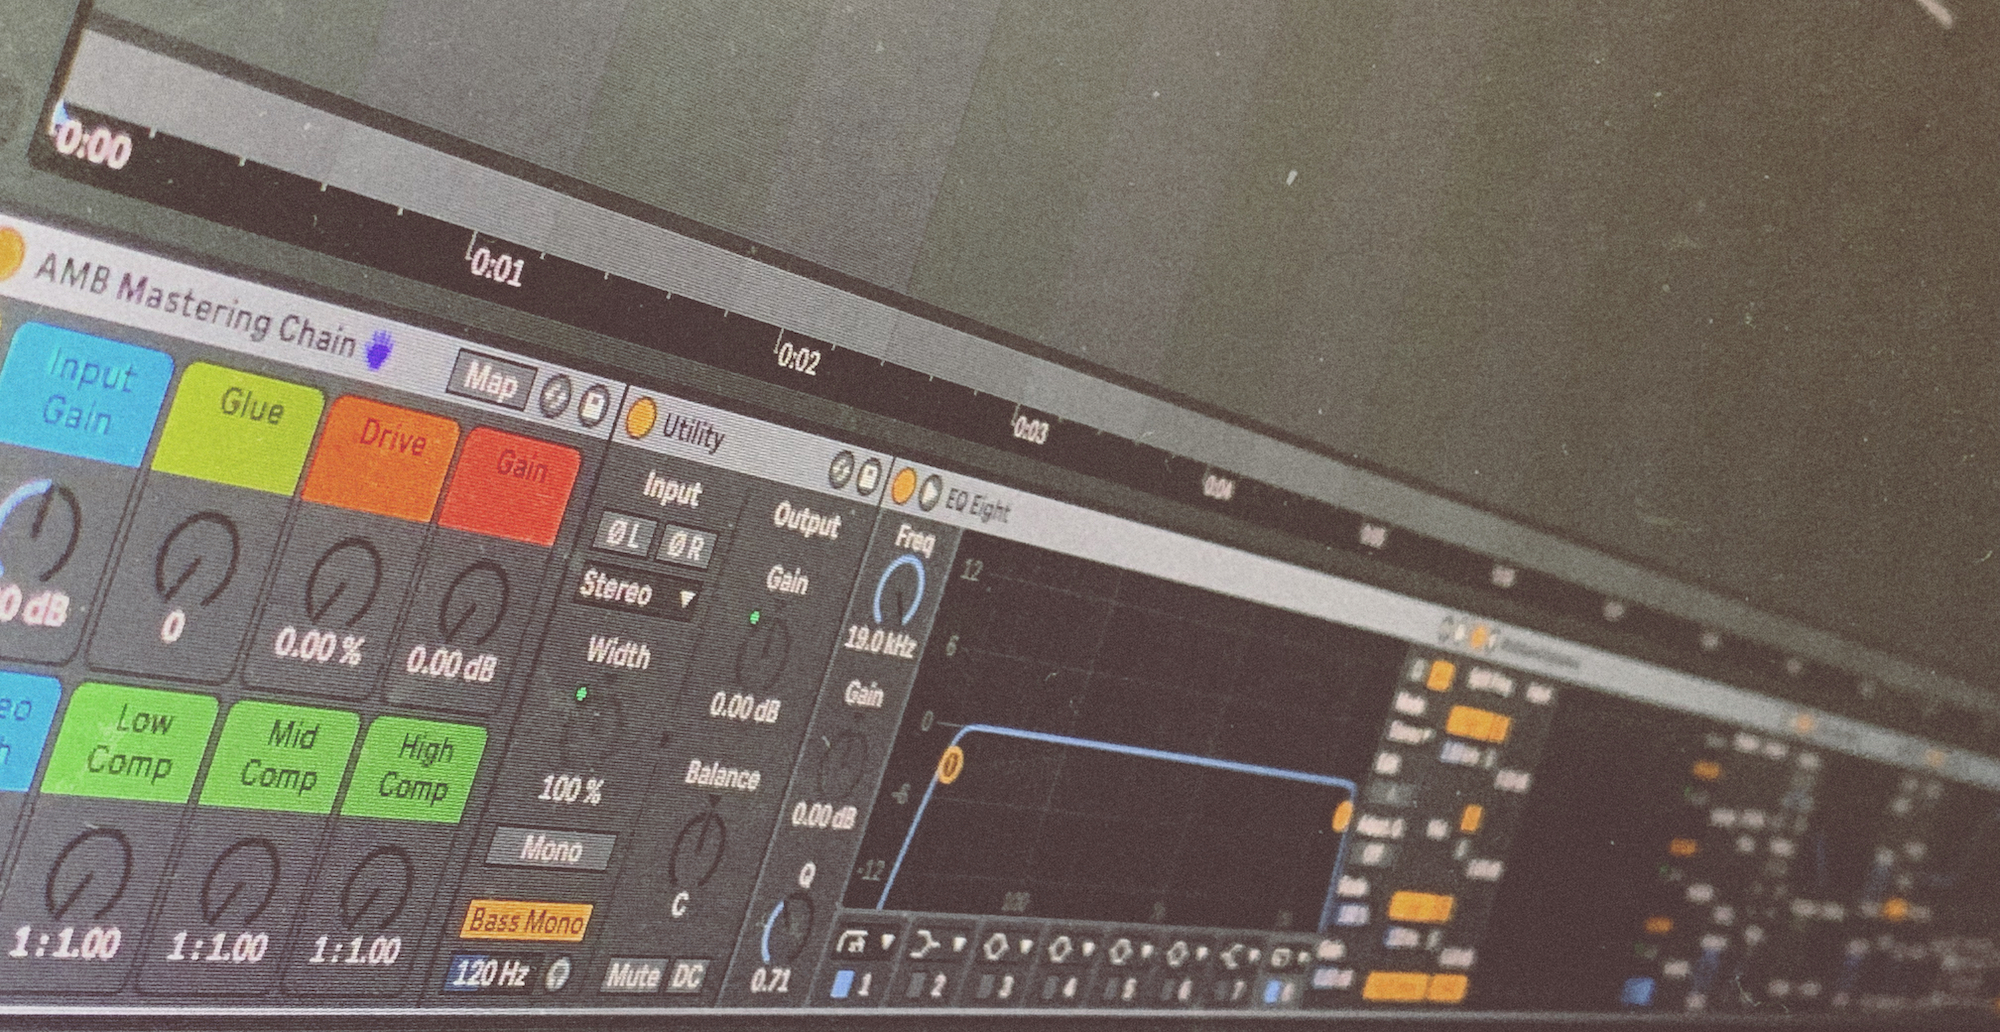
Final rack with all devices visible
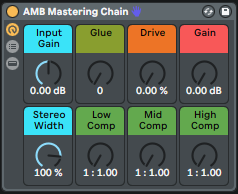
Final device with only the macro controls visible

Final macro mappings
Application
Using the macro mapping ranges, I tried to make sure the device will not harm or damage your sound but will only add to it and enhance it. That said, try to be moderate with the parameters and remember: they are there, in case you need them. Don’t crank them to the max just because they are there.
Start with checking your master channel peak values with the device off. Then switch it on, and start experimenting with the Glue, the Drive, and the multi-band compressor macros. Make sure you don’t bring the ‘Input Gain’ and the ‘Gain’ all the way up, as that most likely will result in distortion.
These posts are fun to make but they take a lot of time to put together. Please consider donating, it means a lot and enables me to create more cool stuff like this. I deeply appreciate your support. Thank you.